Mastering Rust Programming: A Beginner's Guide
A Comprehensive Rust Guide: Start from Basics to Traits, Ownership, and Concurrency

Why Rust?
Memory Safety - No null pointer, no dangling pointer, no data races.
High Performance - Offers performance close C/C++, great for System-level code.
Fearless Concurrency - Safe, easy multithreading without headaches.
Developer Experience - Friendly compiler errors, modern tooling (Cargo), and a supportive community.
Rust Basics
Variables and mutability (let, mut, const)
Rust lets you declare or instanstaniate a variable similar to typescript but with some major differences.
let fruit = "Apple";
fruit = "Orange" // throws you an error saying this variable it not mutable
By default, variables in Rust are immutable, meaning once you assign a value, it’s locked—you can’t change it unless you explicitly tell Rust otherwise. To make a variable flexible, you add the keyword mut when declaring it, letting the compiler know it’s allowed to change. But here’s the twist: Rust’s variable declarations come with a sneaky catch we’ll uncover a bit later.
let mut fruit = "Apple";
fruit = "Orange" // successfully compiles
In Rust, const works much like in TypeScript—you must initialize it when declaring, and its value can never change. The only difference is in style: Rust’s convention is to name constants in ALL_CAPS_WITH_UNDERSCORES, just to make sure they stand out like the unshakable values they are.
const HEALTHY_FRUIT = "Apple";
Data types (scalar, compound)
A scalar type refers to the basic primitive data types like integers, floating-point numbers, Booleans, and characters. In contrast, compound types are formed by combining multiple values—either scalars or even other compound types—into a single unit.
Integer Types
| Length | Signed | Unsigned |
| 8-bit | i8 | u8 |
| 16-bit | i16 | u16 |
| 32-bit | i32 | u32 |
| 64-bit | i64 | u64 |
| 128-bit | i128 | u128 |
Generally the bits are represented in two basic structure signed and unsigned bits let me explain you what exactly this means…
A signed integer (
i8,i16, etc.) ranges from−(2^(n−1))to2^(n−1) − 1. For example, ani8covers −128 to 127. The reason it stops atn−1? The very first bit is reserved to carry the number’s mood—positive or negative—so you lose one bit of range.An unsigned integer (
u8,u16, etc.) plays it simple:0to2^n − 1. Au8goes from 0 to 255 because there’s no sign bit hogging space. Every bit is dedicated to counting upwards, which makes unsigned the cheerful cousin that only deals with positive vibes.
Float Types
Rust offers two main floating-point types: f32 and f64. Their ranges work similarly to integers, depending on the size you choose. By default, Rust uses f64 for better precision, but you can explicitly declare f32 when you need a smaller, faster option.
let x = 2.0;      // f64 by default
let y: f32 = 3.0; // explicitly f32
Boolean Type
Rust’s boolean type is represented by bool and can hold only two values: true or false. It’s most commonly used in conditions and control flow.
let is_active: bool = true;
let is_admin = false; // type inferred as bool
Character Type
Rust’s character type is char, and unlike some languages, it represents a Unicode scalar value, not just ASCII. That means it can store letters, numbers, symbols, and even emojis.
let letter: char = 'R';
let symbol = '#';       // type inferred as char
let emoji = '🔥';
Touple Type
In Rust, a tuple is a compound type that can group together values of different types into a single structure. Tuples have a fixed size—once declared, they can’t grow or shrink. You can access their values by index or even destructure them into separate variables.
let tup: (i32, f64, u8) = (500, 6.4, 1);
Since tuple values are distinctly recognized by their position, you can access them in two ways: by destructuring into separate variables or by using the dot (.) operator with an index.
let tup: (i32, f64, char) = (42, 3.14, 'R');

// Destructuring
let (a, b, c) = tup;
println!("b is {}", b);

// Dot notation
println!("First: {}, Second: {}", tup.0, tup.1);
Array Types
In Rust, an array is a compound type that stores multiple values of the same type in a fixed-size, ordered list. Unlike tuples (which can mix types), arrays are strictly homogeneous. Once declared, their size is fixed—they can’t grow or shrink.
Core properties of arrays:
Fixed size (length known at compile time).
Elements must all be of the same type.
Accessed by zero-based indexing (
arr[0]).Stored on the stack (making them very fast).
Common operations:
Access elements with an index (
arr[2]).Destructure like tuples.
Get the length with
.len().Iterate using loops (
for element in arr).let arr: [i32; 4] = [10, 20, 30, 40]; // Access by index println!("First element: {}", arr[0]); // Length println!("Length: {}", arr.len()); // Iteration for val in arr.iter() { println!("{}", val); } // Destructuring let [a, b, c, d] = arr; println!("b is {}", b);
Functions
In Rust, a function is defined with the fn keyword, and its structure looks much like a TypeScript function: a name, parameters, and an optional return type.
Parameters
- Functions can take parameters of any type, just like in other languages. Some values (especially those stored on the heap) can introduce ownership complexities—but for now, you can think of parameters as working the same way as in TypeScript or JavaScript.
Return Values
Functions can return values of any type, with the return type explicitly declared after
->. If the function body is a simple one-liner, you can omit thereturnkeyword and just leave the expression without a semicolon.fn add(x: i32, y: i32) -> i32 { x + y // no semicolon = return }
There’s a lot more to functions in Rust (like ownership, borrowing, and lifetimes), but we’ll keep things simple for now.
Control Flow
If Else
In Rust,
ifandelsework much like in TypeScript—the logic is the same, but the syntax is a bit stricter. Rust doesn’t require parentheses around conditions, and it even allows you to useifexpressions directly when assigning values withlet.let number = 7; if number < 5 { println!("Less than five"); } else { println!("Five or more"); } // Using if as an expression let result = if number % 2 == 0 { "even" } else { "odd" }; println!("Number is {}", result);
Loops
Repeating code with loop
The
loopkeyword tells Rust to execute a block of code over and over again forever or until you explicitly tell it to stop.
fn main() {
    loop {
        println!("again!");
    }
}
In Rust, loops don’t differ much in syntax, but things get tricky with nested loops. To avoid confusion, you can assign a label to each loop. Labels let you explicitly control which loop to break or continue, making your code much clearer.
'outer: loop {
    println!("In outer loop");

    'inner: loop {
        println!("In inner loop");
        break 'outer; // exits the outer loop directly
    }
}
This feature comes in handy when multiple loops are stacked, so you can precisely decide which one to jump out of without losing your sanity.
Using While Loop
When a loop depends on a condition, Rust uses a while loop. It keeps running as long as the condition evaluates to true, making it the go-to choice when you don’t just want an endless loop.
let mut count = 0;

while count < 5 {
    println!("count = {}", count);
    count += 1;
}
Using For Loop
When you need to iterate over a range or a collection, Rust’s for loop is the cleanest option. It handles iteration safely and avoids off-by-one errors that are common in traditional loops.
// Looping through a range
for i in 0..5 {
    println!("i = {}", i);
}

// Looping through an array
let arr = [10, 20, 30];
for val in arr.iter() {
    println!("value = {}", val);
}
Ownership
If you’ve been wondering where Rust really starts testing your patience—this is it. Ownership is the feature that makes Rust both powerful and (at first) slightly headache-inducing. It’s that point where you’ll probably pause, reread the docs, and grab another cup of coffee. Think of it as Rust saying: “Fasten your seatbelt, turbulence ahead.” But don’t worry—once you get it, you’ll realize this is exactly what makes Rust worth learning.
Why Ownership Exists
In languages like TypeScript or Java, memory is cleaned up automatically by a Garbage Collector (GC)—a highly optimized piece of code that handles messy stuff like null pointers, dangling pointers, and memory leaks. The trade-off? You rarely think about memory management at all.
But in low-level languages like C, you manage memory yourself. That sounds powerful, but let’s be honest: writing bug-free, leak-free memory code in C is like walking a tightrope blindfolded—possible, but not fun.
Rust takes the middle ground. It gives you direct control of memory, but with rules that keep you from shooting yourself in the foot. No garbage collector, no hidden magic—just predictable, safe memory management.
Stack and Heaps
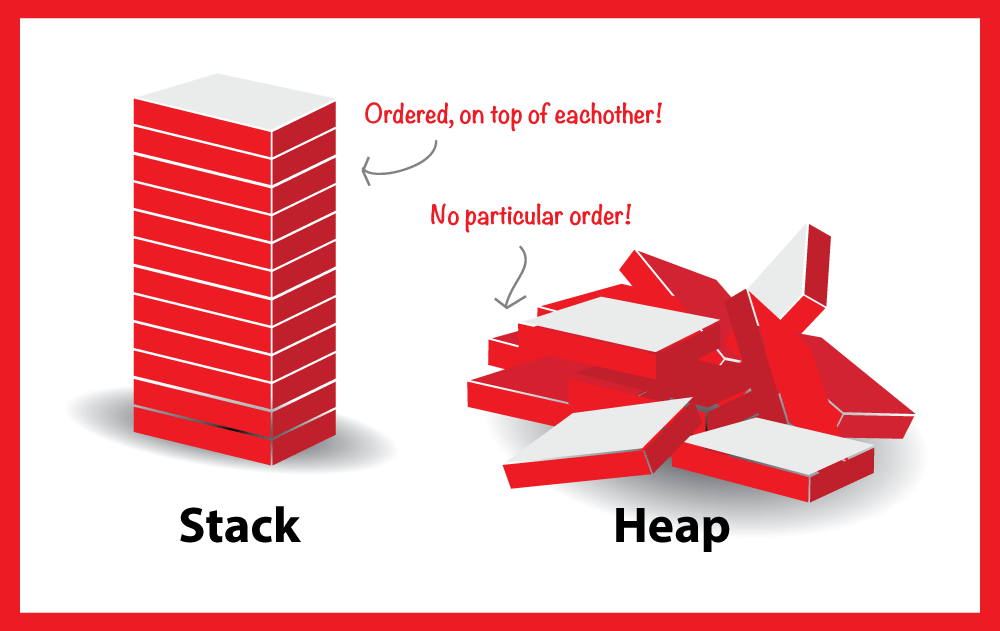
Basically there are two types of memory that are used by your program Stack and Heap memory.
Stack Memory
In Rust (and most languages), stack memory is managed in a very orderly fashion—think of it like a neat stack of trays in a cafeteria. Data is pushed in and popped out in a predictable LIFO (Last In, First Out) manner, which is why accessing and storing values here is blazing fast.
The stack is best suited for data that:
Has a fixed size (known at compile time).
Can be managed in this ordered, temporary structure.
Because the stack is relatively small and grows only in one direction, trying to store things with unpredictable or infinite size (like dynamically growing data) can quickly lead to the dreaded stack overflow. That’s why arrays of fixed size, scalar values, and simple structures are great candidates for the stack, but more flexible data (like Vec<T>) needs a different place.
fn main() {
    let x: i32 = 42; // stored directly on the stack
    println!("x is {}", x);
}
Here, x is stored directly on the stack. Rust knows at compile time that i32 is exactly 4 bytes, so it just pushes it onto the stack like a clean entry in a to-do list.
Heap Memory
That different place is the heap. Unlike the stack, the heap is designed for data whose size may not be known until runtime, or that needs to live longer than the stack frame where it was created. Allocation here is slower, since the system has to find free space in a large pool of memory, but it gives you flexibility.
fn main() {
    let s: String = String::from("Hello, Heap!");
    println!("{}", s);
}
Here’s what really happens:
The pointer, length, and capacity of the string live on the stack.
The actual string data
"Hello, Heap!"is stored on the heap.
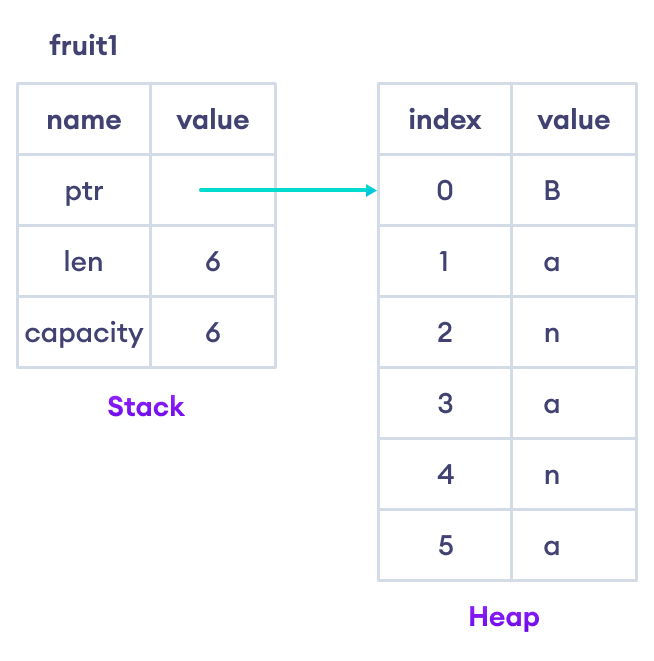
So the stack just says: “Hey, the real stuff is over there, at this memory address.”
String and Slices
When we declare a string in Rust there is generally two ways to define it…
1. String
The String type is the full, growable string. Under the hood, three things (the pointer, length, and capacity) are stored on the stack, while the actual text lives on the heap.
Because strings can grow or shrink at runtime, they need the heap’s flexibility. But this also means operations like cloning or moving are more expensive—since they involve heap memory.
fn main() {
    let mut s: String = String::from("Hello");
    s.push_str(", world!"); // modifies the heap data
    println!("{}", s);
}
2. &str (String Slice)
A slice is like a lightweight view into a string. Instead of owning the heap data, it just keeps a pointer and length that refer to part (or all) of an existing string. Slices are extremely efficient because they don’t copy data—they just borrow a piece of it.
fn main() {
    let s: String = String::from("Hello, world!");

    // Create a slice referencing part of the string
    let hello: &str = &s[0..5];
    let world: &str = &s[7..12];

    println!("Slice 1: {}", hello);
    println!("Slice 2: {}", world);
}
Here, hello and world are just references to parts of s. No extra heap allocation is made.
Now that you have a clear idea of stack vs heap memory and how String is stored (with its pointer on the stack but actual data on the heap), we can connect this to Rust’s ownership model.
The ownership rules in Rust are most relevant for heap-allocated data—because that’s where things usually go wrong in other languages:
Memory leaks when heap data is never freed.
Dangling pointers when something tries to access memory that was already freed.
Read-write conflicts (data races) when multiple parts of a program try to mutate the same heap data at the same time.
Rust’s ownership system was designed to eliminate these problems at compile time, without needing a garbage collector.
Let’s imagine Heap data (like String) is a girl 👩, and the owner is her boyfriend 👦.
Every girl must have a boyfriend → Every heap value must have an owner.
She can have only one boyfriend at a time → A value can only have one owner.
If the boyfriend leaves, she’s gone too → When the owner goes out of scope, the value is dropped.
If another guy wants to date her → Ownership must be transferred (moved). No two owners at once.
fn main() {
    // Boyfriend owns the girl (heap data: String)
    let boyfriend1 = String::from("Alice"); // Alice is the girl

    // Transfer of ownership (new boyfriend)
    let boyfriend2 = boyfriend1;

    // println!("{}", boyfriend1); ❌ Error!
    // The first boyfriend lost ownership after breakup.

    println!("Now only boyfriend2 owns: {}", boyfriend2);
}
Explanation:
When
boyfriend2 = boyfriend1happens, the ownership of"Alice"(the girl on heap) moves fromboyfriend1toboyfriend2.boyfriend1can no longer access"Alice".If we try to print
boyfriend1, Rust gives a compile-time error, preventing double-dating (two owners for the same girl).
Now this is why Rust feels strict but safe: it enforces this “one owner rule” to avoid memory bugs.
fn main() {
    let s = String::from("hello");  // s comes into scope

    takes_ownership(s);             // s's value moves into the function...
                                    // ... and so is no longer valid here

    let x = 5;                      // x comes into scope

    makes_copy(x);                  // Because i32 implements the Copy trait,
                                    // x does NOT move into the function,
                                    // so it's okay to use x afterward.

} // Here, x goes out of scope, then s. However, because s's value was moved,
  // nothing special happens.

fn takes_ownership(some_string: String) { // some_string comes into scope
    println!("{some_string}");
} // Here, some_string goes out of scope and `drop` is called. The backing
  // memory is freed.

fn makes_copy(some_integer: i32) { // some_integer comes into scope
    println!("{some_integer}");
} // Here, some_integer goes out of scope. Nothing special happens.
Ignore the concept that you don’t understand and let’s discuss the owenership rule in the Rust. You see in the above code when a string is passed in the function direclty it takes it’s ownership by default and after the function call the variable goes out of scope.
When you pass a String into a function, Rust doesn’t give the function a “clone” of the girl (heap data). Instead, the whole boyfriend role (ownership) is transferred. The function is now her boyfriend. When the function ends (boyfriend dies), the girl (data) also dies.
Passing by Reference (Borrowing Instead of Breakup)
But Rust gives you a choice: instead of always moving ownership, you can just let the function borrow the girl.
That means:
The ownership stays with you (she’s still your girlfriend).
The function just gets temporary access (like hanging out with her).
You get to decide:
Immutable Borrow (
&T) → read-only → many friends allowedMutable Borrow (
&mut T) → read-and-write → one boyfriend only, exclusive hanky panky
And here’s the catch:
If she’s with friends (immutable refs), no hanky panky is allowed.
If she’s with one boyfriend (mutable ref), then no other friends or boyfriends can exist at that time.
Rust is like the strict parent making sure these rules are never broken.
Why is This Important?
In languages like C/C++, two guys can mess around with the same girl at once:
Write–Write conflict → both try hanky panky → chaos
Read–Write conflict → one is chatting with her while the other is doing hanky panky → corrupted results
Rust says:
“Only one boyfriend at a time, no cheating!”
1. Ownership Transfer (Breakup → New Boyfriend)
fn main() {
    let s = String::from("Alice"); // s owns Alice (girl)
    takes_ownership(s); // ownership moved into function

    // println!("{}", s); Error: s no longer owns Alice
}

fn takes_ownership(girl: String) {
    println!("Now function owns: {}", girl);
} // girl (Alice) drops here automatically
2. Many Friends, No Boyfriend (Immutable Borrow)
fn main() {
    let mut name = String::from("Alice");

    let bf = &mut name; // boyfriend time
    bf.push_str(" ❤️"); // hanky panky

    println!("Exclusive boyfriend moment: {}", bf);

    // let f = &name; Not allowed: can't have friends during hanky panky
}
Many friends, all good.
3. Exclusive Hanky Panky (Mutable Borrow)
fn main() {
    let mut name = String::from("Alice");

    let bf = &mut name; // boyfriend time
    bf.push_str("s*x"); // hanky panky

    println!("Exclusive boyfriend moment: {}", bf);

    // let f = &name; Not allowed: can't have friends during hanky panky
}
One boyfriend only. No friends allowed.
4. Borrowing Without Breakup
fn main() {
    let s = String::from("Alice");

    borrow_string(&s); // borrowing, not breakup

    println!("Still my girlfriend after borrowing: {}", s); // Still mine
}

fn borrow_string(girl: &String) {
    println!("Just borrowing Alice as a friend: {}", girl);
}
Traits & Generics
Traits
Think of traits as Rust’s version of interfaces (from TypeScript/Java).
They define a set of methods (behavior) that a type must implement.
Traits can also provide default method implementations, so not everything has to be re-written.
Structs, enums, or even primitive types can implement traits.
Traits can be used for polymorphism (writing code that works across multiple types).
// Define a trait
trait Greet {
    fn greet(&self); // method signature
}

// Implement trait for a struct
struct Person {
    name: String,
}

impl Greet for Person {
    fn greet(&self) {
        println!("Hello, my name is {}", self.name);
    }
}

fn main() {
    let p = Person { name: "Alice".to_string() };
    p.greet(); // Calls trait method
}
Core points about traits:
Traits can be derived automatically (
Debug,Clone,PartialEq).Traits can be generic bounds (restricting which types work in functions).
Traits can be implemented for existing types (extension behavior).
You can also have trait objects (
&dyn Trait) for runtime polymorphism.
2. Generics
Generics is similar as it is in any other language like Jave/Typescript.
Generics let you write code that works with any type, without duplication.
Defined using
<T>,<U>, etc.Very common in collections (
Vec<T>,Option<T>,Result<T, E>).Often combined with trait bounds to restrict behavior.
// Generic function
fn largest<T: PartialOrd + Copy>(list: &[T]) -> T {
    let mut max = list[0];
    for &item in list {
        if item > max {
            max = item;
        }
    }
    max
}

fn main() {
    let nums = vec![10, 20, 5, 30];
    println!("Largest number: {}", largest(&nums));

    let chars = vec!['a', 'z', 'k'];
    println!("Largest char: {}", largest(&chars));
}
3. Traits + Generics Together
Traits and Generics are usually paired to build reusable and safe abstractions.
trait Area {
    fn area(&self) -> f64;
}

struct Circle { radius: f64 }
struct Square { side: f64 }

impl Area for Circle {
    fn area(&self) -> f64 {
        3.14 * self.radius * self.radius
    }
}

impl Area for Square {
    fn area(&self) -> f64 {
        self.side * self.side
    }
}

// Generic function with trait bound
fn print_area<T: Area>(shape: T) {
    println!("Area: {}", shape.area());
}

fn main() {
    let c = Circle { radius: 5.0 };
    let s = Square { side: 4.0 };

    print_area(c);
    print_area(s);
}
Error Handling
1. Result<T, E> Basics
Resultis everywhere in Rust’s standard library — file I/O, networking, parsing, etc.Signature form:
enum Result<T, E> {
    Ok(T),
    Err(E),
}
- Example: Opening a file with std::fs::File always returns
Result:
use std::fs::File;

fn main() {
    let file_result = File::open("data.txt");

    match file_result {
        Ok(file) => println!("Opened file successfully: {:?}", file),
        Err(e) => println!("Could not open file: {}", e),
    }
}
This way, errors are part of the function signature — you can’t ignore them.
2. unwrap and expect
Use sparingly, mostly in quick prototyping or tests.
Panic = program crashes immediately and unwinds the stack.
expectis better thanunwrapbecause you at least get context in the error message.
let file = File::open("data.txt").expect("Failed to open data.txt");
// If file doesn’t exist → "Failed to open data.txt: No such file or directory"
In production, rely on match or ? operator, not unwrap/expect.
3. Safe Error Handling with match
The
matchexpression is extremely powerful.It forces you to cover all possible cases, which prevents accidental unhandled errors.
  fn divide(a: i32, b: i32) -> Result<i32, String> {
      if b == 0 {
          Err("Division by zero!".to_string())
      } else {
          Ok(a / b)
      }
  }

  fn main() {
      let result = divide(10, 0);

      match result {
          Ok(val) => println!("Division result: {}", val),
          Err(msg) => println!("Error occurred: {}", msg),
      }
  }
Insights on match:
Exhaustiveness → You must handle both
OkandErr. Compiler forces this.Destructuring → You can directly pull values out.
 match divide(20, 5) {
     Ok(v) if v > 2 => println!("Big value: {}", v), // match + guard
     Ok(v) => println!("Small value: {}", v),
     Err(e) => println!("Error: {}", e),
 }
Pattern matching goes beyond Result: you can match Enums, Tuples, Structs, even ranges.
4. if let and while let (Shorthand for match)
if letlets you ignore unwanted branches when you only care about one case.Example:
  if let Ok(v) = divide(9, 3) {
      println!("Quick success: {}", v);
  } // Err case ignored
while letis handy for loops over fallible operations (like reading from a file/stream):
    let mut stack = vec![1, 2, 3];

    while let Some(top) = stack.pop() {
        println!("Popped: {}", top);
    }
if let and while let cut down boilerplate, but match is safer if you want to guarantee all cases are covered.
5. The ? Operator (Error Propagation)
Works with any type implementing
FromResidual(so bothResultandOption).Equivalent to writing a
matchthat returns early onErr.use std::fs::File; use std::io::{self, Read}; fn read_file() -> Result<String, io::Error> { let mut file = File::open("data.txt")?; // if Err → return Err immediately let mut contents = String::new(); file.read_to_string(&mut contents)?; Ok(contents) }Cleaner, reduces noise in deeply nested code.
Lifetimes
Lifetimes in Rust are one of the most unique concepts you’ll encounter. They’re not something you’ll typically see in languages like Java, TypeScript, or even C++.
At their core, lifetimes are Rust’s way of making sure that references are always valid. They prevent dangling references (a reference to memory that has already been freed).
fn longest(x: &str, y: &str) -> &str {
    if x.len() > y.len() {
        x
    } else {
        y
    }
}

fn main() {
    let string1 = String::from("abcd");
    let string2 = String::from("xyz");

    let result = longest(string1.as_str(), string2.as_str());
    println!("The longest string is {}", result);
}
If you paste this code into your IDE, you’ll get a lifetime-related error. Rust doesn’t know if the reference returned from longest will always be valid, because it depends on the arguments passed in.
Why does this happen?
You know that variables are stored in stack or heap, and their lifetimes depend on scope. Rust wants to guarantee that whenever you return a reference, the data it points to will still be valid.
In the function above, Rust cannot automatically prove that both x and y will live long enough for the returned reference to be safe.
Rust says:
“Wait… you’re giving me back either x or y. But how do I know both of them live long enough? What if one is destroyed too soon? I need proof.”
Lifetime annotations
To solve this, Rust lets you specify lifetime parameters. Lifetimes are written with a ' followed by a name, like 'a.
Here’s how we fix the code:
fn longest<'a>(x: &'a str, y: &'a str) -> &'a str {
    if x.len() > y.len() {
        x
    } else {
        y
    }
}
What this means:
'ais a lifetime parameter.Both
xandymust live at least as long as'a.The returned reference will also live at least as long as
'a.
Think of it like this
Lifetime = how long a reference is valid.
Rust wants to be 100% sure that whenever you use a reference, the original value is still alive.
If it’s not sure, you must tell it explicitly with a lifetime annotation like
'a.
Key Rules
You don’t control lifetimes. Values live as long as their scope.
You only write lifetimes to help the compiler understand.
In most simple cases, Rust figures it out for you (That’s why you rarely see lifetimes in basic code).
Collections and Iterators
Rust gives us a few powerful, built-in collections. The most common ones are:
Vector (
Vec<T>) – ordered, growable listHashMap (
HashMap<K, V>) – key → value pairsHashSet (
HashSet<T>) – unique unordered values
Vector
Think of a vector as an expandable array.
Stores values in order.
You can push, pop, loop over it.
  fn main() {
      let mut v: Vec<i32> = Vec::new(); // empty vector
      v.push(10);
      v.push(20);
      v.push(30);

      println!("{:?}", v); // [10, 20, 30]

      // Access by index
      println!("{}", v[1]); // 20

      // Safe get (returns Option)
      if let Some(val) = v.get(2) {
          println!("Third element = {}", val);
      }

      // Loop
      for num in &v {
          println!("{}", num);
      }
  }
HashMap
HashMap is like a dictionary: keys map to values.
Keys must be unique.
Values can be anything.
  use std::collections::HashMap;

  fn main() {
      let mut scores = HashMap::new();

      scores.insert("Alice", 50);
      scores.insert("Bob", 70);

      println!("{:?}", scores); // {"Alice": 50, "Bob": 70}

      // Get a value
      if let Some(score) = scores.get("Bob") {
          println!("Bob's score = {}", score);
      }

      // Update or insert if missing
      scores.entry("Charlie").or_insert(30);

      // Loop
      for (name, score) in &scores {
          println!("{}: {}", name, score);
      }
  }
HashSet
HashSet is just a collection of unique values.
No duplicates allowed.
Useful for membership checks.
  use std::collections::HashSet;

  fn main() {
      let mut numbers = HashSet::new();
      numbers.insert(10);
      numbers.insert(20);
      numbers.insert(20); // ignored, already exists

      println!("{:?}", numbers); // {10, 20}

      // Check membership
      if numbers.contains(&10) {
          println!("Set has 10");
      }

      // Remove
      numbers.remove(&20);
  }
Iterators
Iterators let you process collections step by step without writing manual loops.
They are lazy – nothing happens until you call a method like
collect,sum, orfor_each.fn main() { let v = vec![1, 2, 3, 4, 5]; // Basic loop for x in v.iter() { println!("{}", x); } // Map (transform each item) let doubled: Vec<_> = v.iter().map(|x| x * 2).collect(); println!("{:?}", doubled); // [2, 4, 6, 8, 10] // Filter (keep only some items) let even: Vec<_> = v.iter().filter(|x| *x % 2 == 0).collect(); println!("{:?}", even); // [2, 4] }
Concurrency in Rust
Concurrency means doing multiple tasks at the same time (or giving the illusion of it). Rust gives us tools to write concurrent programs without data races — something C/C++ struggle with.
1. Threads
A thread is like a lightweight worker that runs alongside your main program just like in Java.
use std::thread;
use std::time::Duration;

fn main() {
    let handle = thread::spawn(|| {
        for i in 1..5 {
            println!("Hello from spawned thread: {}", i);
            thread::sleep(Duration::from_millis(500));
        }
    });

    for i in 1..5 {
        println!("Hello from main thread: {}", i);
        thread::sleep(Duration::from_millis(500));
    }

    handle.join().unwrap(); // wait for spawned thread to finish
}
thread::spawnstarts a new thread.joinmakes sure the thread finishes before the program exits.
2. Move Closures
By default, a thread’s closure borrows variables, but sometimes that’s unsafe. You can use move to transfer ownership to the thread.
use std::thread;

fn main() {
    let numbers = vec![1, 2, 3];

    let handle = thread::spawn(move || { //using a shortform like arrow functions in Javascript.
        println!("Numbers = {:?}", numbers);
    });

    handle.join().unwrap();
}
Here, the vector is moved into the thread, so the main thread can’t use it after. This prevents dangling references.
Async & Await in Rust
Rust also supports asynchronous concurrency, which is about handling lots of tasks without blocking threads. Instead of spawning thousands of OS threads, async uses an event loop.
use tokio::time::{sleep, Duration};

#[tokio::main] // it is a macro
async fn main() {
    let task1 = async {
        sleep(Duration::from_secs(1)).await;
        println!("Task 1 done");
    };

    let task2 = async {
        sleep(Duration::from_secs(2)).await;
        println!("Task 2 done");
    };

    tokio::join!(task1, task2);
}
3. Message Passing (Channels)
Instead of multiple threads poking at the same data, Rust encourages channels: one thread sends data, another receives it.
use std::sync::mpsc; // multi-producer, single-consumer
use std::thread;

fn main() {
    let (tx, rx) = mpsc::channel();

    thread::spawn(move || {
        let vals = vec!["hello", "from", "thread"];
        for val in vals {
            tx.send(val).unwrap();
        }
    });

    for received in rx {
        println!("Got: {}", received);
    }
}
tx= transmitter,rx= receiver.Threads send messages instead of fighting over shared data.
Data Structures
1. Arrays & Slices
Arrays
Fixed-size collection of elements of the same type.
Size must be known at compile time.
Stored entirely on the stack.
Useful for small, static collections.
  fn main() {
      let arr: [i32; 3] = [1, 2, 3];
      println!("Length: {}", arr.len());
  }
Slices
A dynamically sized view into an array (or
Vec).Don’t own data → just borrow it.
Size is flexible but can’t be changed (not growable).
Useful when passing parts of an array to functions.
  fn main() {
      let arr = [10, 20, 30, 40];
      let slice: &[i32] = &arr[1..3];
      println!("Slice: {:?}", slice); // [20, 30]
  }
2. Tuples
Group multiple values of different types into one compound type.
Fixed in size.
Accessed via indexing (
tup.0) or destructuring.Commonly used for lightweight grouping or returning multiple values from a function.
  fn main() {
      let tup: (i32, f64, &str) = (42, 3.14, "hi");
      let (x, y, z) = tup;
      println!("({}, {}, {})", x, y, z);
  }
3. Structs
Custom, named data types to group related fields.
Similar to classes without inheritance.
Support methods via
impl.Types:
Classic (named fields).
Tuple structs (unnamed fields).
Unit structs (no fields, often markers).
  struct Person {
      name: String,
      age: u8,
  }

  impl Person {
      fn greet(&self) {
          println!("Hi, I'm {}.", self.name);
      }
  }

  fn main() {
      let p = Person { name: String::from("Alice"), age: 25 };
      p.greet();
  }
4. Enums
Define a type by enumerating possible variants.
Each variant can hold different types/data.
Often used with
matchfor exhaustive handling.Enums +
match= safer alternatives to “switch” in other languages.enum Shape { Circle(f64), Rectangle(f64, f64), Square(f64), } fn area(shape: Shape) -> f64 { match shape { Shape::Circle(r) => 3.14 * r * r, Shape::Rectangle(w, h) => w * h, Shape::Square(s) => s * s, } }
5. Option<T>
Represents an optional value.
Used instead of
null.Variants:
Some(T)→ value exists.None→ no value.
Forces you to handle both cases explicitly → safer code.
  fn get_even(nums: &[i32]) -> Option<i32> {
      for &n in nums {
          if n % 2 == 0 {
              return Some(n);
          }
      }
      None
  }
6. Result<T, E>
Represents the outcome of an operation: success or failure.
Variants:
Ok(T)→ success, with a value.Err(E)→ failure, with error info.
Foundation of Rust’s error handling.
Often combined with
?operator for propagation.fn divide(a: i32, b: i32) -> Result<i32, String> { if b == 0 { Err("Division by zero".to_string()) } else { Ok(a / b) } } fn main() { let res = divide(10, 2); println!("{:?}", res); // Ok(5) }